
The Disk Sander is used to smooth materials such as woods and
plastics. It is also used to remove small amounts of waste material. It is a
dangerous machine if safety is ignored.
Goggles must be worn at all times. Hands and fingers must be kept as far away
from the rotating disk as possible. A guard, making it impossible to use the
wrong portion of the rotating disk must be in permanent position. If the right
hand side of the disk were to be used the material would be quickly lifted
upwards. This would be very dangerous.
A Dust extraction unit should be connected to this type of machine. This is very
important as it will extract dust particles produced when the machine is in use.
The disk rotates in an anti-clockwise direction which means only the left
portion of the disk should be used. The rotation of the disk holds the work down
on the table.
Lose clothing must be held back by an apron. Long hair must
be tied back for personal safety.
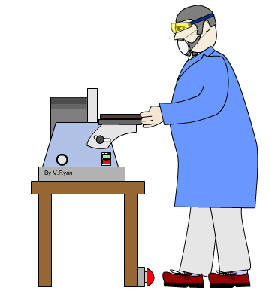
The diagram below shows the machine operator carefully using the disk sander.
The material is carefully and lightly pushed against the rotating disk and at
the same time moved from left to right. Only the exposed part of the disk can be
used because of the position of the guard.
Most disk sanders have an adjustable table. This allows the material to be sanded to an angle. Releasing a locking nut allows the table to be adjusted, the locking nut is then tightened keeping the table in position. This can be very useful. However, the gap between the table and the disk increases as the angle is increased. This means that greater care must be taken when sanding material to produce an angle.

If the sanding disk is permanently bolted to a table an emergency stop button must be added. This means that the disk sander can be turned off by simply tapping the foot switch.
Sheet sanders are used to sand / smooth wood surfaces although they can be used to sand / smooth materials such as plastics and metals as well. When sanding wood, glasspaper is ‘clipped’ into the sheet sander. If the surface requires a lot of sanding then start with ‘coarse’ glasspaper rather than fine - as this will reduce the amount of time required. Fine glasspaper can be used to finish the surface so that it is smooth to touch. When in use the rectangular base vibrates at 1200 rpm (revolutions per minute). This ‘sands’ the surface of any material beneath it.

1. Always plug power
tools into a RCB (circuit breaker) as a safety measure against electrical
faults.
2. Wear goggles to protect eyes from
dust/chippings and a face/dust mask to prevent breathing in dangerous dust
particles.
3. Always read the manufacturers
instructions very carefully and follow them.
4. Always seek instruction / training from
an appropriately qualified instructor before using any tools, especially power
tools.
5. Make sure that the mains cable cannot be
tripped over or that it causes a hazard in anyway.
6. G Cramp the material to be sanded to a
firm workbench before starting.
7. Fit an extraction bag to the sheet
sander. This will collect most of the dust.
SHEET SANDER AND GLASSPAPER
A large range of sheet sanders are available from DIY stores and catalogues. When selecting a sander ensure that it is provided with a dust extraction bag system and always plug into a RCB (circuit breaker). Modern, cheap sanders are usually good quality but if you intend to carry out a lot of sanding invest in a more expensive and better quality version.
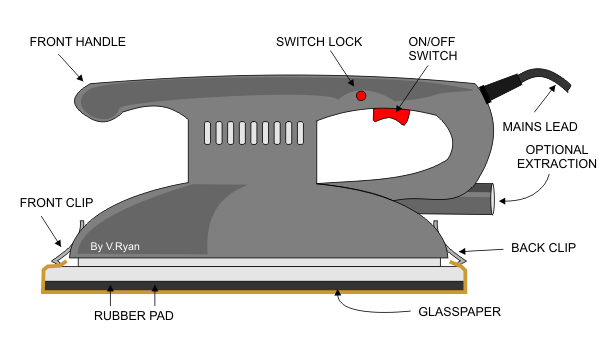

To replace worn glasspaper, press the clip at the back of the sander and pull out the glasspaper. Do exactly the same with the front clip. Clip fresh glass paper in position.
Glasspaper is manufactured from crushed glass glued to a suitable backing such as cloth or paper. People often call glasspaper ‘sandpaper’. However, the last people to make sandpaper were the Egyptians, over 4000 years ago. The various grades of glasspaper are shown below:
| VERY FINE | FINE | MEDIUM | COARSE |
| Flour | 2/0, 0, 1 | 1, F.2, m.2 | S.2, 2, 3 |

PALM SANDERS
V. Ryan © 2006
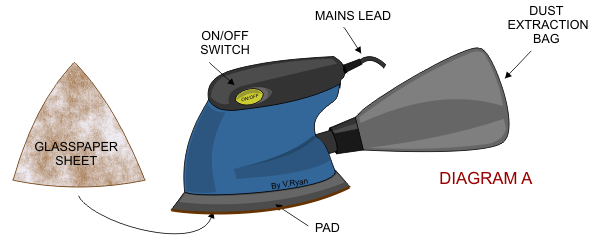
Palm sanders are extremely useful tools and they fit into the palm of one hand comfortably. They are relatively light, easy to control and cheap. The glasspaper sheet is normally fixed to the pad with velcro and this means that it can be replaced easily. Because they are quite small and have a ‘triangular’ shape to the pad, they can be used to sand into corners. For example, the diagram below shows how the sander can be used in the 90 degree corner of a door panel.

SAFE USE OF PALM SANDERS
1. Always plug power
tools into a RCB (circuit breaker) as a safety measure against electrical
faults.
2. Wear goggles to protect eyes from dust
and a face/dust mask to prevent breathing in dangerous dust particles.
3. Always read the manufacturers
instructions very carefully and follow the written instructions.
4. Always seek instruction / training from
an appropriately qualified instructor before using any tools, especially power
tools.
5. Make sure that the mains cable cannot be
tripped over or that it causes a hazzard in anyway.
6. G Cramp the material to be sanded (where
possible) to a firm workbench before starting sanding.
7. Fit an extraction bag to the palm sander.
This will collect most of the dust.